

Follow this guide to prepare the animal's ear, activate the CowPro device, and position it correctly. A good installation helps the wound heal well, takes care of the animal's well-being, and ensures that the device sends its data smoothly.
Before you begin
Have all the material at hand:
- CowPro devices and their batteries.
- The pliers, the safety tapes, the taps and the fasteners.
- An animal-friendly piercer and disinfectant.
- Healing spray with a curling effect.
- The connectivity kit already installed.
Steps
- Pierce the ear.
- While healing, activate the devices.
- After 6 to 8 days, place the device.
- Send a photo to the CowPro team.
Plan ahead: between drilling and placement, 6-8 days must pass. Use those days to activate and check the devices.
1. Pierce the ear
A well-placed piercing prevents discomfort and infection, and prevents the device from coming loose or deforming the ear.
Where to drill
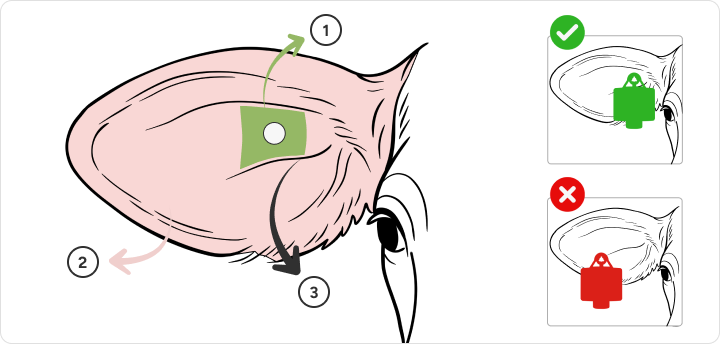
- Recommended area: at the top of the ear, between the two cartilages and near the head. Here the weight of the device is better distributed.
- If the ear is very thick: Move the piercing slightly towards the center of the ear so that the device is not too tight.
- Avoid visible veins and go through cartilage.
How to Drill
- Hold the animal securely and wait for it to be calm.
- Clean and disinfect the ear and piercing. Also disinfect the piercer between animals.
- Make the hole in the recommended area.
- Apply healing spray with a sleech killer effect.
While healing
Check the ear for swelling and signs of infection.
Wait 6 to 8 days before inserting the device. Do not place it if the piercing is inflamed, infected, or has not healed well.
2. Activate the CowPro device
Activate and check each device before placing it. You can do this while your ear heals.
Place the battery
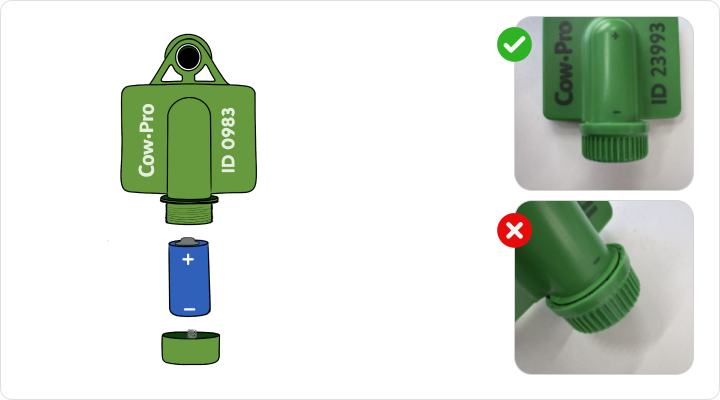
- Unscrew the cap from the device.
- Insert the battery respecting the orientation of the poles (+ and −).
- Replace the cap and screw it by hand as far as it goes.
The cap should be flush with the body, with no visible thread. If it becomes loose, moisture or dust may enter, or the battery may come loose. Close it only by hand: tools can damage the device.
Check that it transmits
- Check in the app if the connectivity kit appears on the map as connected, green.
- Leave the devices outdoors, within the antenna coverage area, for at least 30 minutes to pick up the GPS signal.
- Check in the CowPro app that all devices are casting.
Don't place a device that doesn't cast. If one doesn't appear in the app, contact support before installing it.
3. Place the device
When the ear has healed and the device is activated, you can place it. Before you begin, place the device on the pliers along with the safety strap and the double plug on the other end.
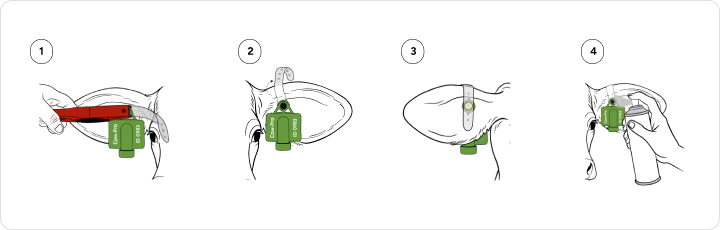
- Bring the pliers closer to your ear, above or below, whichever is most comfortable for you. Staple the device through the healed hole and detach the pliers.
- Pass the tape behind the ear and choose the hole that rests on the ear, without slack and without pressing. This way the strap holds the weight and the device does not dance.
- Insert the fastener through the hole in the safety strap and screw it onto the tap.
- Apply healing spray on the piercing and Check that the device rotates freely; if it is too tight, it can cause excessive rubbing and cause injuries.
In case of thick ears: if the male barely protrudes behind the ear, do not put on the safety tape.
4. Send a photo to the CowPro team
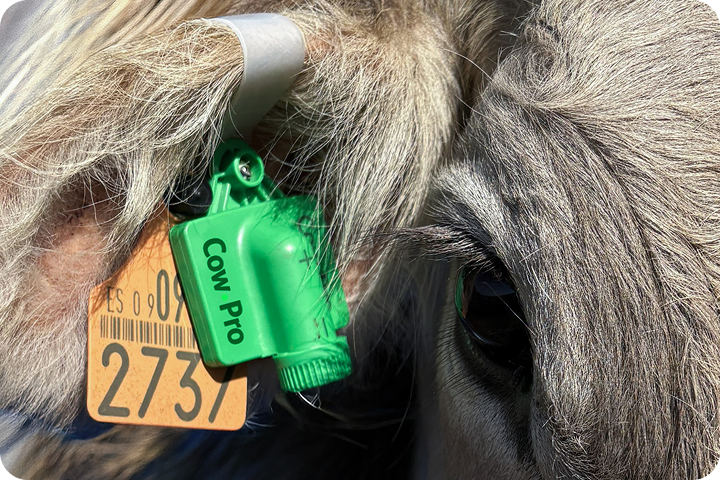
When you're done, take a photo of the ear with the device in place and send it to the CowPro team via WhatsApp. The photo will allow us to check that the installation was done correctly and help you if any adjustments need to be made.